|
a documentary of a listening room metamorphosis by Steve Deckert We have taken a small room with all the inherent problems (12 dB peek at 221 Hz being the worst) and given it the performance of much larger room. How do you make a tiny 13 x 15 room larger? The Zen technique would indicate that you make the room smaller and believe it or not we actually did just that! The "listening room" before enlightenment... There was a reason for this at the time. Until the Zen amp came along, I was a dedicated speaker designer and well aware of the acoustical problems most rooms present so I tried to make sure I had an "average room" to use as a reference. The irony of that was in consistency. A room like this one will never sound the same way twice because your head will never be in the exact (to within a 1/2") spot twice. That presents a continuous level of frustration that many of you share I'm sure. As you can see, the couch or listening position was near the back wall, the speakers are only a foot or so away from the front wall, although I always DID pull them out to listen. Notice the TV in the window? When you're done chuckling about that take a good look at the wall around it, and realize how hard this surface is. Also the coffee table just in front of the listening position. THIS IS ALL BAD! In doing some model response plots for our room - after the painful decision to sell the couch and loose the TV I might add - we found the ideal speaker placement and listening position for the room and used that as a starting point. We applied the WASP technique to observe the differences. After doing the Wilson Audio Setup Procedure we averaged in the suggested computer modeled locations and re-did the last steps of the WASP. This we agreed gave the best sound/imaging we could obtain and tried many other ways just to confirm it. Once settled on the correct setup of all the equipment ( well speakers anyway) we measured the response of the room from the listening position seven ways from Sunday. The results were terrible but typical. There was a large 12 dB problem in the mid bass, a huge 9 dB hole at 80Hz and several high frequency problems as well. At this stage, and armed with this knowledge we still couldn't help but judge the stereo equipment harshly. I remember in particular I grew to hate Dynaudio's new little 6.5" woofer and thought there hundred dollar tweeter was the worst sounding damned thing I ever had to put up with. (Even on tube gear mind you.) Technically this is what is happening in this now ideally set up "small" listening room: The speakers are about 6 feet apart and the listening chair centered about 6 or 7 feet back, speakers toed in directly at the listener. The distance to the side walls from the speakers is about 40 inches. Since this is the closest surface, it is considered the 1st reflection point. Sound hits that from off axis radiation patterns emitted by your speakers. It then hits the next surface, the rear wall behind the listening chair. From there it hits the opposing side wall on the other channel and the finally hits the front wall behind your speakers where it is now aligned once again to travel directly at the listening position. The problem with all this is simply that the direct energy from your speakers hits your ear in just a few milliseconds. The same sound that goes past your ear, and around the room to finally reflect back to you from the front wall is delayed in time by so much that it creates confusion in the brain. The brain hears both sounds, one slightly delayed on top of the original and has a hard time deciding where the source of the sound actually is. This is often referred to as cloudy, smeared, flat, etc. To handle these reflections, we used quadratic prime number sequencing to create diffusers that would spread sound out in a 180 degree fan instead of a direct reflection that a wall brings. By doing so, we diffuse the sound energy at that reflection point dramatically, so the reflections that leave it on their journey to the next wall, are substantially lower in energy. This diffusion also adds a delay to the energy that will help widen the gap between the direct energy and reflected energy our mind tries to interpret.
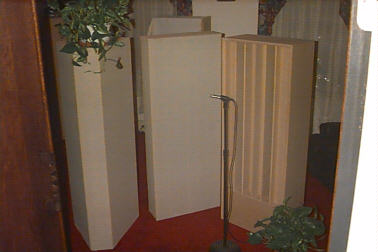
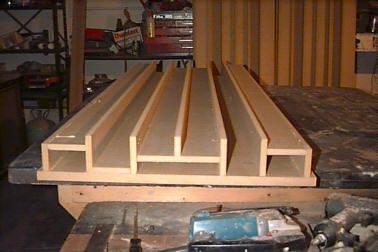
Pictured here
is the side wall sequence. (S.W.A.L.) Note: Pictured during construction.
What you see finished is the back of the wells and the diffuser
blades only. This assembly will go into a frontless coffin (for
lack of a better word) which will allow it to be a free standing
(portable) unit and give us plenty of space for the other half
of the product - the absorber. Here is a picture of the sequence used to treat the front and rear walls. These deeper wells offer results lower in the frequency band. These were a particular project to design and build because of the tension between an engineer who couldn't operate a screw gun (Dan) and myself, the more artistic craftsman type. The bottom line is that the tension was worth it in the end. Without both of our strong headed wills these products would have been non ergonomic and somewhat compromised. All this diffusion
will be wonderful for handling higher frequencies from 200 Hz
on out to 8 kHz, but in our room the lower frequencies were the
big problem. Remember a huge peek a 220, a giant dip at 80 Hz
and then a 60 Hz swell (I forgot to mention that one.) To handle
these issues we had to first recognize that the bass energy our
system produces was abundant (even though it sounded thin and
sloppy) And to effectively get flatter bass and MORE bass in the
room we had to somehow get rid of most of it! Since we learned and measured for ourselves how the low frequencies always find the corners of the room and stay along the walls and floor, those are the areas that we have to deal with. By drinking the energy that accumulates in these areas we can reduce the reflection and thereby reduce the cancellation that creates the holes in your room where there is no bass. Because we know we will effectively be wrapping the entire room with these diffusion units, we knew it would be a perfect opportunity to incorporate absorption into the back of each unit and along the bottoms. This will do a couple of things. One it will absorb the air space between the unit and wall that will certainly be concentrated with bass energy. Two it will absorb resonance's from the diffuser wells created by low energy and lastly it will give a nice even blanket of controlled absorption throughout the room creating a nice barrier between you the listener and the crappie sheet rock walls of most homes. Boy if they only had these as C.E.S. non of the manufacturers would have had a escape-goat for why their stuff sounded bad. (grin)
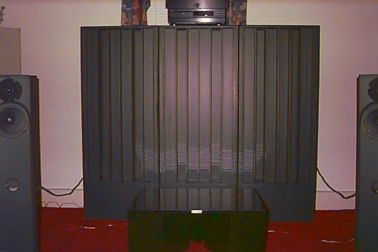
At one point we compared one of these units to the more popular light weight tube traps. To make a long story short, we had to make a 300 mile radius to borrow enough of the darn things to match the absorption of this CWAL. It took 22 of them, and naturally there was no place to put the speakers when we were done. This is for real, so please consider it a wake up call, and realize that this is what it takes. When all was said and done, we ended up with three finished products. From the left
to right is a side view of the CWAL, the SWAL, and without a fabric
sock is the DWAL. We built 8 DWAL units, and 4 SWALL units, and
2 CWALL units for the room. Actually we built more than that,
but the treatment was so effective some of it had to come back
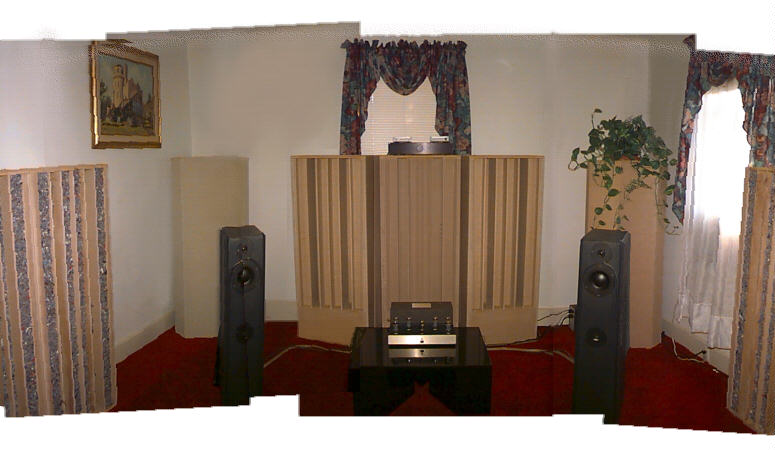
out. The first item was one CWAL unit placed in one corner of the room. Then a week of listening. The model issues of the room changed and you could hear it. The bass was tight now, WAY MORE DETAIL and speed was apparent. Some say it dry cleans the bass! The huge dip at 80 Hz was now a mere glitch, and the 220 Hz peak was reduced noticeably. Then we brought in a second unit and repeated the process of listening and measuring. It doesn't matter which corner the units are in for low freq. absorption, however we found having them on the front wall corners behind the speakers offered a tighter sounding mid bass which the CWAL is also controlling. I had to take five photos and paste them all together to get this shot, and now I can't even find the Big version of the picture.. No wait, here it is, I found it. This shows almost everything but the rear wall. The side wall units made the sound stage extend out past the speakers, the front and rear wall units added a clarity that either one of us have ever heard, and if you knew our backgrounds that alone would be a pretty impressive statement. The three units on the front wall being perhaps the most critical, make the front wall disappear. Before depth in recordings was a 4 to 6 feet at best, and now the sound stage extends through the wall as though it were gone. I've heard recordings 100 feet deep. Now, there are a few things you should know. Before in this tiny room that we just finished making 2 feet smaller, a pressure of 104 dB would create excessive boom, and confusion throughout. The sound would get harsh and distorted. I always blamed that on the amplifier. With this treatment in, the room LOVES PRESSURE and boy we gave it some too! The stereo was only good for about 112 dB without clipping, so we set up a live band in there and recorded it!
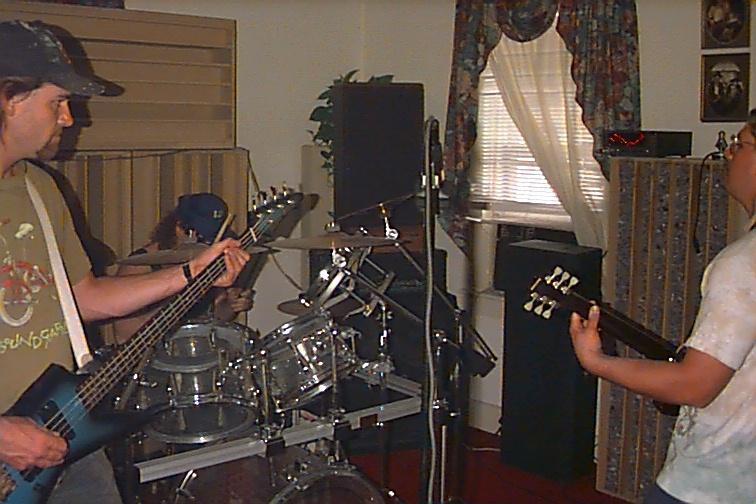
Sorry for the big picture but some things can't be compromised! At the time I shot this picture, the pressure in the room was averaging at 119 dB. Now, in a 13 x 15 room (no I guess it's now a 11 x 13 room) that is LOUD! For those of you
who have spent hours listening to music and watching the "snake"
of your trusty Audio Control RTA (real time analyzer) you should be
astounded to see the RTA in the picture doing a perfect snake set
to the A weighted scale with 3 dB increments between dots. I'm not
going to go into how good this is, but needless it to say the recording
was nothing short of amazing, and that's amazing!
Decware is a trademark of High Fidelity Engineering
Co. |
 Naturally
we had to put these diffusers on every wall at the major problem
points, and we had to design diffusers that worked in a linear
fashion across a wide frequency band from 200 Hz to at least 4
kHz. We concluded that the needs of the side walls were different
than the needs of the front and rear walls so we designed two
sequences for the diffuser wells.
Naturally
we had to put these diffusers on every wall at the major problem
points, and we had to design diffusers that worked in a linear
fashion across a wide frequency band from 200 Hz to at least 4
kHz. We concluded that the needs of the side walls were different
than the needs of the front and rear walls so we designed two
sequences for the diffuser wells. 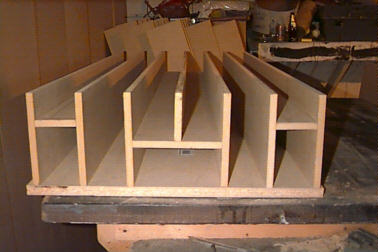
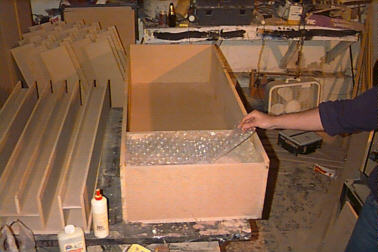 and
to do that we needed to absorb it.
and
to do that we needed to absorb it. 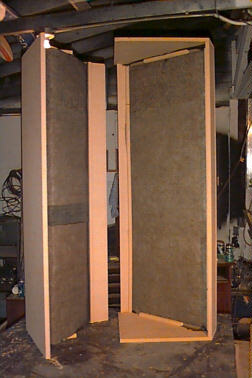 So
along these lines when we got to the corners where we knew there
would be no diffuser units placed, we really got serious and created
a HUGE diaphragmatic linear absorbing structure designed to by
the mere act of placing it into a corner, eliminate the corner
and it's associated side effects. These corner units (C.W.A.L.)
absorb clear down to 23 Hz and weigh a 151 pounds! Wanna know
a secret... that's exactly what it took to correctly treat the
problem. Anything less is a placebo.
So
along these lines when we got to the corners where we knew there
would be no diffuser units placed, we really got serious and created
a HUGE diaphragmatic linear absorbing structure designed to by
the mere act of placing it into a corner, eliminate the corner
and it's associated side effects. These corner units (C.W.A.L.)
absorb clear down to 23 Hz and weigh a 151 pounds! Wanna know
a secret... that's exactly what it took to correctly treat the
problem. Anything less is a placebo.