The Radial Loudspeaker Project
1998 by Steve Deckert
| THE INSPIRATION
Not more than a day or two later, another gentlemen out of nowhere named Ole Thofte emailed me about a similar speaker he himself had done as a d.i.y. project and asked me if I could stop by and take a look at it. This I did, and was pleased to see someone with a genuine inventor's spirit going at it full tilt. Made something out of nothing, and I bet it did in fact do some things really right sonically. Anyway, I gave him my impressions and compliments half tempted (as I'm sure was his intention) to build one of the darn things myself. This seed enjoying the fertility of an over active mind, only took about a day to sprout and sure enough I found myself donating time I really don't have to the adventure! Below is the project, and as you will see it is not like those that inspired it, but something a little different that should work! I say should, because I'm waiting for the glue to dry while I write this. THE DESIGN
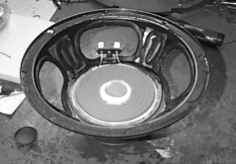
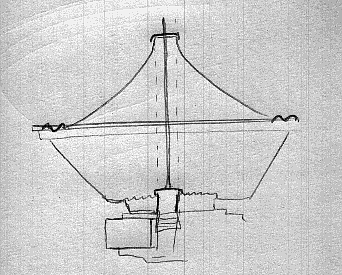
Looking at this design you have to ask what does it really do? The cone being a tapered cylinder means that it will resonate into a 360 degree pattern around the speaker. I would imagine higher frequencies can be found at the top of the cone where the diameter is smallest. This unit is meant to be pretty much full range, so we can think of the top area of the cone as our tweeter which is surround by a stamped steel basket and large magnet assembly. When I look at this, I can't imagine any way that having this large monstrosity covering the top of the cone could possibly sound right. There would have to be large amounts of refraction and subsequent localization. Also the parallel surface baffle of the cabinet would in my mind further amplify the problem. This lead me to wonder what would happen if the unit was designed with the motor assembly below the cone so that you truly did have a undisturbed dispersion pattern. I should think that it would be possible to do just that. As Ole recommended, I would build a cylinder rather than a box for the enclosure. I would size it so that the diameter of the enclosure exactly matches (or at least very closely matches) the diameter of the driver. That alone should make a marked improvement in the transparency department. Assuming
relocation of the motor assembly was possible, i.e.. by using a pole
to connect the top of the 1/4 wave cone to the voice coil in the base,
then the top of the Stepping back for a second and getting a perspective on this I concluded that the objective of such a design is to play as close to full range as possible and radiate sound in a 360 degree field. My immediate thought to follow was hey, I can do that with a regular speaker cone. Why do I need to get involved with all this bending wave stuff and use a straight cone anyway? I hate straight cones. I like exponentially shaped cones because they in my opinion have far less potential for ringing, as well as disperse the sound in a more natural pattern. MY IDEA IS... Well, I know what I'm going to do... it won't take long, won't cost much, and be a kick for the rest of the day! I'm going to build a similar driver using an exponential cone and move the basket and motor assembly so they are no longer part of the equation. I'm going to mount this in a cylinder to whatever height I need to accommodate the volume of air needed for the driver to properly Q out. It should look pretty cool. I will make it delicate, fast, and full of fidelity rather than try to make it slam real loud. The first thing we'll need is a basket with the magnet assembly attached. I think I will go with an 8 inch diameter because I want the unit to have some efficiency, but still have some potential for good top end response. I chose what looks like possibly an old ESS speaker and removed the original cone, voice coil, spider etc. etc. until it was clean. I liked this basket because it had an extended back plate that allowed the original design to be long throw. The voice coil was unusually long with a wind width exceeding 1.25". My idea
is to make a delicate high efficiency unit that sounds really magical,
I don't care about the bass, and I don't care about the power handling.
It has been my observation over the years that the less a cone moves
the better the fidelity. So with the
parts I have in mind, that being an almost underhung voice coil and
light weight paper cone, I should be able to use the extra depth in
the bottom of this basket for a dual spider assembly.
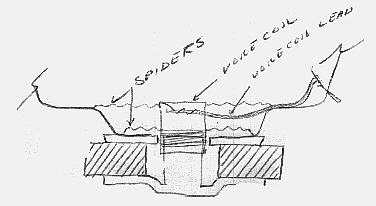
As you can see by my sketch the voice coil leads are attached at the top of the coil former on opposing sides and run between the spiders. This means you have to install the leads before the second spider goes on. The nice thing about using two spiders in this design is that the voice coil becomes supported an no longer rubs. Usually you have to install the cone before you can get the voice coil to stop rocking when you push on it. This should make the steps to follow go a little easier. Now that
the voice coil, leads, and spiders are installed we can hook it up and
test it a little. Should be interesting to hear what a motor assembly
and basket sound
No sound
would have been better. I was really amazed at how much sound
there was! I used my B&K to sweep it back and forth, and in the
band between 400 and 2 kHz this little bugger was loud! A good
88 dB or so I would say. So where is this sound coming from?
Well, with it in your hand it is easy to feel that the sound is the
resonance's of the steel basket itself being excited by the voice coil.
Boy if this isn't ever testament to how a basket can ring. I can
squeeze it as tight as I can and make it reduced by several dB.
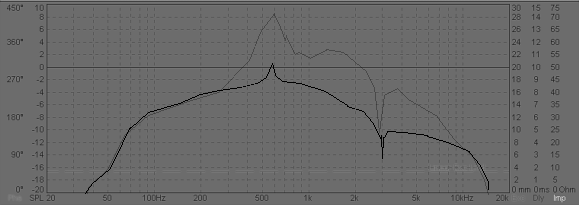
First thing I did is apply a vico elastic self adhesive matte to the basket. This material I had laying around and was easy to cut with a scissors and stick on. I cut 1 x 2 inch squares and applied 4 of them to the inside of the basket between the large air holes. This made the following improvement.
As you
can see, not much. I then noticed that the energy in the basket
seemed to exit the basket at the edges. So the windows stamped
into the sides, and the top rim are where this 700 cycle resonance is
converting to sound. I took some sticky gasket material used for
mounting woofers (available from parts express free when you buy woofer)
and stuck it on the inside of the basket around the edges of the stamped
openings. This narrowed the peek by 1/2, a noticeable difference.
Yet I could still feel a tremendous amount of energy in the sides of
the basket between each stamped opening. So, one more time, stuck
a bunch more of it there too.
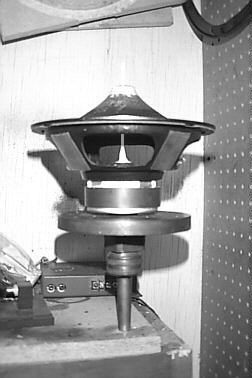
The next thing to do was to select and install a cone. I want paper, no question about that. I also want a nice exponential shape, a nice curvature. I would like one that comes to as narrow a point as possible. I chose a very fragile light weight paper cone with a paper m-roll surround. Similar to the cones used in early musical instrument speakers. It has a hole for a one inch voice coil so it should work well.
I took a break to think about the best way to attach these two points and decided that the smaller the "pole or stick" used the better. I didn't want anything hollow. I went for the giant Q-tip! To install it, I glued a 1" paper voice coil cap in place on the voice coil with a touch of foam sponge stuck to the back for good measure. I then drilled a hole in a second 1" paper voice coil cap so that the diameter of the wooden Q-tip would just pass through it. I broke one of the ends off the toothpick and left the swab on the other end. I dipped the swap in my favorite magic glue, and placed it in the center of the voice coil cap. At the same time I glued the cone in place.
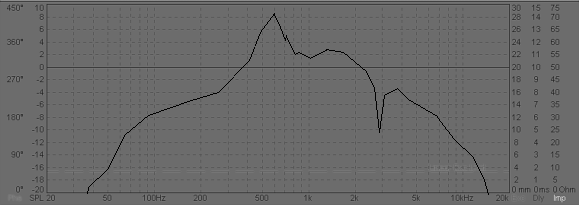
While watching it dry (a favorite pastime of mine) it occurred to me that this little jewel would work perfectly fine mounted vertical in a conventional speaker box. And the more I look at it the more I think the wave fronts coming off this cone protruding into the room would be superior in every way to those of a conventional inverted cone. I guess I'll find out when I try it that way. The next step and the most exciting will be to measure it's Thiel&Small parameters and frequency response. I wonder if the typical beaming effect will show up at some frequency as it does in other inverted cone speakers. I really wonder what the efficiency will be and the gram weight of the moving mass (cone and Q-Tip) will be! Anxious to hear this, I hooked it up to the B&K and started sweeping. It was efficient, I had to turn the output way down. For some reason there was a peek at 2 kHz that just about killed me and the cat! Hmm. I swept and swept but it just wouldn't go away! Of course! The stick! I haven't cut it off yet! It is sticking out of the center of the cone at least an inch and a half! With the stick removed I tried again and found the response to be without any peeks! The beaming effect was gone too! Rolled in the bass and top end, the response is really very smooth! Below is what I got out of it.
The measured
specs came out as follows:
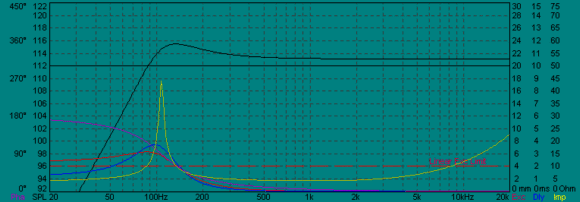
After running the computer simulation, I decided to go with a sealed box. The ideal size was just over 3 cubic feet although it worked in .46 cubic feet all the way out to over 10 cubic feet. This driver would be perfect for a folded horn loudspeaker cabinet. The above plot was done with 40 watts. PART II - The LISTENING First off, I listened to it back at the bench on my mid-fi test equipment and it sounded, well... bad. It would have to have a tweeter which means that we've failed in the full range department. It does have a nice bottom end though, and a wonderfully fast tight mid-bass. Since my moving mass was only 10 grams (about 1/3 rd that of a typical 6.5" woofer) I really thought it would go up higher. The inverted cone shape must not be loading any of the higher frequencies, and I wondered about that. Anyway, the fact that I don't like the way it sounds yet is a good sign. So far anything really high end has always sounded like crap back on my bench stereo. This means when I take it into the listening room and introduce it to some Zen, it will either sound fabulous or terrible. It has established that there will be no in between! Lets see,
I need an enclosure... something I can quickly stick this thing into
for a quick listen. I grabbed a tube made of 1/2" PVC about 24"
high and used that. Hooked it up and frankly it sounded better
when I held it my hand. Well that is the tube... I can ignore
that for the moment. I grabbed a tweeter (Vifa) and hooked it
up with the new driver and set it haphazardly next to it. Now
I had a full range speaker happening. It seems to be holding its own pretty well with the normal speaker on the other channel back at the bench so now lets show it some Zen and see if this project is over or just beginning! Of course thoughts are coming to mind about reflections and the whole debate between direct and reflected energy. The fact that Dan would shit his pants if he knew I was doing this makes it all the more worth while btw. Unlike the Walsh with that huge magnet on top, this unit has no obstructions and will consequently project in a straight line to the ceiling. Knowing this, I can determine that my image will be the exact center between the ceiling and the top of the cone. With an 8 or 9 foot ceiling I should get an image center about 5 to 6 feet from the floor. That would be big, that would be good. BACK FROM LISTENING WITH ZEN This
project just went from fun to butt serious. I'm excited and
irritated at the same time. Irritated because my reference speakers
just got their doors blown off real bad. This weekend Dan talked me into letting him use my room treatment at a home theater show so my listening room is naked. The other night tried to listen in there and just couldn't do it anymore. As I write this page, the "pile" is setting on the left channel and the right channel is still hooked up to my reference tower. The Zen amp is running both units in Triode with 2 watts per channel. The new speaker is louder than my reference by almost 3 dB. The sound stage and image is larger and deeper (I think) than I've ever heard it. Why does that always seem to happen when you pair mismatched speakers I wonder? I can't
believe the sound that is coming out of this thing. I'm finding
it sort of upsetting. So far this project has made me do some pretty
deep thinking about sound/dispersion and room effects. Now I'm
so much smarter I'm totally confused. I know one thing for sure...
I will have to finish this speaker, and make a mate for it. I
wont be surprised if it replaces my reference speakers. I also
won't be surprised if it ends up being the most pleasing sounding speaker
I've ever done. Another 24 hr Zen guided whim that materialized for all our benefit thanks to this web! Part
two will have to be construction of the enclosure. |
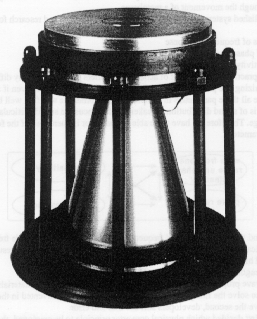 One of the neat things about the Internet is the spontaneity of communications
and ideas. The other day I received an e-mail discussing the Ohm
F Walsh speaker, a radial bending wave speaker design using a 1/4 wave
cone. The thing rather looks like a miniature water tower or perhaps
an upside down megaphone.
One of the neat things about the Internet is the spontaneity of communications
and ideas. The other day I received an e-mail discussing the Ohm
F Walsh speaker, a radial bending wave speaker design using a 1/4 wave
cone. The thing rather looks like a miniature water tower or perhaps
an upside down megaphone.
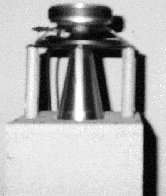 Although
tempted to build a Walsh type bending wave speaker, I can see in my
minds eye several potential problems with it's performance. This
was further substantiated when I read the excellent documentation of
Although
tempted to build a Walsh type bending wave speaker, I can see in my
minds eye several potential problems with it's performance. This
was further substantiated when I read the excellent documentation of
 I chose a voice coil the correct diameter for this woofer basket that
had a wind width of just over 1/4 inch. This way the coil will
always be in the magnetic gap and that is important for not only efficiency,
but transient ability. The original voice coil used in this basket
had 1 inch of coil outside the magnetic gap at all times. That
was so that it could move a large distance. Just the opposite
of what we want here.
I chose a voice coil the correct diameter for this woofer basket that
had a wind width of just over 1/4 inch. This way the coil will
always be in the magnetic gap and that is important for not only efficiency,
but transient ability. The original voice coil used in this basket
had 1 inch of coil outside the magnetic gap at all times. That
was so that it could move a large distance. Just the opposite
of what we want here.
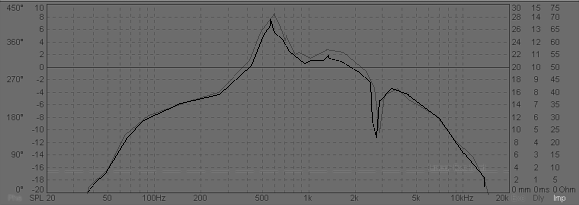
 Now
we were getting somewhere, the basket sides are much quieter, the peek
is now so narrow it is like a focused point (spike) on the chart.
It is coming from the outside diameter of the basket. When I hold
this real tight I can reduce the peek. I think that if the basket
is installed into the enclosure with this same sticky rope caulk, the
peek will almost be gone. In addition I will use a cast rubber
gasket to further absorb the peek. Below is the final result of
the basket tweaking before it is installed into the enclosure.
Now
we were getting somewhere, the basket sides are much quieter, the peek
is now so narrow it is like a focused point (spike) on the chart.
It is coming from the outside diameter of the basket. When I hold
this real tight I can reduce the peek. I think that if the basket
is installed into the enclosure with this same sticky rope caulk, the
peek will almost be gone. In addition I will use a cast rubber
gasket to further absorb the peek. Below is the final result of
the basket tweaking before it is installed into the enclosure.
 The
next issue, I'm sure you've been wondering, is how to attach the cone
to the voice coil when the cone is installed upside-down! My first
idea was to create a cylinder 1" in diameter and attach it to the inside
of the voice coil. Problem with that is it creates a pipe that
would be sure to resonate and after all the trouble I just went through...
The
next issue, I'm sure you've been wondering, is how to attach the cone
to the voice coil when the cone is installed upside-down! My first
idea was to create a cylinder 1" in diameter and attach it to the inside
of the voice coil. Problem with that is it creates a pipe that
would be sure to resonate and after all the trouble I just went through...
 I
then took the second voice coil cap with the hole in it and installed
it on the cone so that the Q-tip would protrude up through the cap.
After the glue dries I can cut off the excess. The white stuff
you see is the glue when wet. Once the shaft is installed between
the two points it's time to let everything get good and dry.
I
then took the second voice coil cap with the hole in it and installed
it on the cone so that the Q-tip would protrude up through the cap.
After the glue dries I can cut off the excess. The white stuff
you see is the glue when wet. Once the shaft is installed between
the two points it's time to let everything get good and dry.

