|
Zen TORII Mk II designer's notes
In this paper I will be covering the design and construction of the new Torii in great detail because many of it's finer points would never be known if I didn't. It's the sum total of these details that make this amp superior to most of the ho-hum sounding push pull amps out there. I consider this our flagship amplifier although I prefer to call it our reference amp since audio products labeled "flagships" tend to be more audio jewelry than anything else.
Part I - I had a dream to build an amp like this many years ago... a short story that explains what motivated me to build this. Part II - Why the original TORII was replaced with this new design... a brief explanation of what could be improved. Part III - First attempt at replacing the original TORII circuit... it wasn't going to be that easy. Part IV - Designing a pentode circuit to be linear with zero feedback... now I know why so few designer's accomplish this with success.. Part V - Simpler is usually better... I have collected around 800 interesting schematics for push pull tube circuits over the years. Part VI - Why 25 watts beats more power... this is the cutoff point in the grand power vs. fidelity scale. Part VII - Construction Details... and parts descriptions.
Part VIII - Listening tests... and general ramblings.
PART I - I had a dream to build an amp like this many years ago It's interesting the full circle I've come in my personal audio journey. It's one that started in the 1980's when I discovered that I could afford tube amps if I could just learn to fix them. You could buy vintage push pull amps for less than fifty bucks at garage sales all day long. They were ugly and needed plenty of attention, but they sounded so much better than the Pioneer and even Harmon Kardon receivers that were so popular throughout the 70's. My plan was simple: Get the schematics from the library (Sam's photo facts), use my wood working skills to create a beautiful chassis and change the layout of the parts to a symmetrical balanced look. Then simply wire it all up again and I'd have a killer amp. With a solid background in electrical contracting and computer programming and hardware design I figured it couldn't be that hard to figure out how amplifiers worked so I jumped in with both feet. Turned out I had no idea how complex analogue circuit design was. I wired my first one up so it looked like a masterpiece inside and plugged it in with great anticipation. The only thing that came out of it was smoke. I spent every evening for 30 straight days trying to make it work. Every time I got ready to plug it in for another test my heart would start beating widely and I would duck under the bench (a trick I learned along the way while blowing up capacitors) just in case. Finally on the 31st night I plugged it in and sound came out! It's a moment I'll never forget. I did several more in the coming years. They became ongoing experiments as I discovered how to change the way they sound. I had a lot of fun with it. I ended up with an old Stromberg Carlson circuit, a push pull 35 watt amplifier that evolved to a point where it was always the winner during comparisons. It took me to new places during my listening sessions. I eventually discovered it sounded as good or better than the high dollar tube gear I lusted after but could never afford. By this time in my life I was hard core into speaker design and making a living doing it, but the amp gave me dreams of manufacturing tube amps that sounded better and cost less so all of us poor bastards could have the last laugh. As an audiophile I had developed a good ear early in the game and my hand built amps went from the best I'd ever heard - I'm on top of the world - to unlistenable. It was like a roller coaster and I was still too green to understand why. I could never sell an amplifier that didn't sound great the vast majority of the time you listen to it and I couldn't break past the 50/50 mark. My original goal of selling a push pull amp was pushed aside. About this time I restored some smaller single ended amps by Zenith and RCA and started to notice they consistently sounded better more of the time than all of my push pull amps. The more time I put into to them the better they got until I found myself listening only to them. With these designs I was hitting the 80/20 mark and discovering that 5 good watts is enough to get some damn good sound. This is how the Zen Triode amp came to pass as I discovered that 1.8 watts of triode was also enough to get some damn good sound, it was ideal in fact for late night listening on my 90dB speakers which I frequently used at the time. I've learned two things since those days... A) It's easier to get the sound I like from simple single ended triode circuits and B) To get a push pull amp to sound as good truly separates the men from the boys in amplifier design. When I came up with the great sounding little Zen Triode amp I knew I had something I could sell. Nevertheless, I never stopped trying to get the same sound out of a higher power design during the past 15+ years. Most attempts were single ended designs with multiple output tubes in parallel to get the power higher. They never sounded as good as the single tube per channel. I tried higher power tubes to get there with a single output tube but it always took at least two or more gain stages to drive them. These also never sounded better than the simple little Zen. I've also tried push pull circuits - so many I've lost track to some degree but they too always fell short. The only design that succeeded in being in the same league was the original TORII where I broke some rules with output transformer theory. The tradeoff with that amp was primarily power for fidelity. I got 12 watts per channel out of what could easily have been 30 watts with a conventional output transformer.
PART II - Why the original TORII was replaced with this new design
With the original TORII I used two single ended output transformers wired in series to create the push pull output. Because the amplifier used feedback and the transformers were single-ended they had to match all the way up into the funny business area above 50 kHz where it's impossible to accurately measure them. What this meant is that I would have to build the amp first to find out if a given pair of transformers would work together without becoming unstable. It usually took 3 tries per amp before finding suitable matched pairs. This was making production, specifically labor go way over budget and frankly became something I no longer enjoyed doing. From a karma standpoint I think it's important to really get off of what you build. It's a real shame too because they sounded really good. A perfect amp for limited production or just a great amp for myself, but not something I want to build hundreds of when I find myself rebuilding each one 3 times before it even leaves the bench.
Part III - First attempt at replacing the original TORII circuit Interestingly enough, my first attempt at replacing the amp was to basically duplicate the entire TORII circuit except to use conventional push pull output transformers. This would double it's power and eliminate the possibility of mismatched transformers and the resulting instability that usually followed. However, doing just that confirmed that my wild dual single ended series output transformers in the original TORII were in fact the corner stone of that amps magic sound. (The conventional transformers with twice the power didn't sound as good). Basically it sounded okay, but as far as I was concerned it wasn't too far away from being another ho-hum sounding push pull amp and the world is full of them. I still had not obtained my goal to get a stable higher power amplifier to sound as good or better than a Zen Triode and these first attempts didn't sound near as good as the original TORII so the journey continued.
Part IV - Designing a pentode circuit to be linear with zero feedback I knew the only chance in hell I had to get the amazing depth and imaging of our Zen Triode amps would be to completely eliminate feedback. Problem is that in a Pentode amplifier eliminating feedback is very hard to do without getting a severely tipped up frequency response. It's similar to building a high performance engine with the throttle wired wide open - just a host of problems waiting to happen as soon as you start it up. What I ended up with was a choke regulated power supply using tube rectification. A massive 15 Henry choke was used to achieve serious regulation resulting in a ripple that for all intensive purposes is non-existent. This is simpler, superior and more expensive than the typical cop-out implementation of solid state regulation. (Well that's sure to offend a lot of amp builders). It adds $90.00 more to the cost. Of course the tube rectifiers also adds another $60.00 over the solid state diodes that are so commonly found in today's amplifiers. The next step was to create a tube regulated supply for the control grids of the output tubes. This approach makes the family of Pentodes that are compatible in this amp run far more linear greatly reducing the need for feedback. Here again a few cheap transistors are replaced with tube regulation that adds another $70.00 to the cost. Starting to see why so many production push pull tube amps use negative feedback? Even this wasn't enough to keep the amp from going over the edge on the increasingly popular single driver speakers like Fostex and Lowther in the average listening room. However it did sound perfectly great on conventional audiophile two and three way speakers which I expect will be the dominating market for this amp because of it's higher power. I made the decision at this crossroad to continue working on the circuit so the amp would be compatible with the single driver crowd because frankly high efficiency speakers have greater potential for fidelity. I love a good audiophile speaker just like the next guy but when you hear a great amplifier on a good efficient speaker around 94dB or higher the dynamics and resolution of detail is just simply superior. We've developed several high efficiency speakers that sound great on our little Zen Triode 2 watt amps but hearing the same speakers on an equally good sounding amp with 10 times the power really opens the doors to aural ecstasy and fun! To reach that perfect frequency balance where everything sounds full and even without loosing the pristine detail on the top end I had to create a delicate RC network for adjusting high frequencies. This is perhaps the most important feature of the amplifier because you can adjust the top end presence and detail perfectly for any given loudspeaker. This makes it fully at home with single driver high efficiency speakers AND conventional audiophile speakers.
Part V - Simpler is usually better If you examine tube push pull circuits you find the basic workhorse of early tube amps was the grounded-cathode transformer-coupled output stage. It was usually biased in class A or heavy class AB. Then you find amps that use a fixed bias to increase efficiency. These circuits are more complicated requiring a negative voltage supply and this is usually about the time you find hum balance pots and overly busy circuits as designers focus on specs and greater power output more than fidelity. In my experience fixed bias amps don't sound as good, and the constant need to adjust the bias gives tube amps a bad reputation for being high maintenance. Another thing that gives tube amps this reputation is that so many are built using circuit boards. The heat from tubes when combined with circuit boards always leads to dried out boards that crack or simply fail from the current trying to go through paper thin traces of foil on the board. It is far superior to eliminate the circuit boards and use real wire and point to point assembly. Ultralinear has also become a very popular configuration to the point where audiophiles blindly assume it's always better than an amplifier that is not ultralinear. Ultralinear further increases efficiency allowing the amplifier to develop more power into load. Since so many people think more is better they're not likely to hear the superior difference tube regulated grids make when using a transformer without the ultralinear tap.
Part VI - Why 25 watts beats more power With power comes complexity. There is another reason why I choose 25 watts over 40 or 60 watts. My friend Paul and I call it "usable watts". It simply means how loud can you turn an amplifier up before the sound stops getting better and starts getting worse. It's about class A vs. Class AB or Class B. I've set up this amp at 47 milliamps per tube at idle with a fairly low plate voltage to achieve class A output throughout it's power range. This is the least efficient form of operation. By running the tubes at a lower bias current the overall heat developed at the power transformer would drop, and the power into load would go up. The catch is that by doing so you drop the class A operation in exchange for class B at some point as the amplifier is turned up. So you might have a 40 watt amplifier but it may only run in class A for the first few watts. To our ears that means you have a 40 watt amplifier with only a few usable watts. The 25 watt amp that is always in class A operation gives 25 usable watts so we find ourselves being able to enjoy higher volume levels on the lower powered amp.
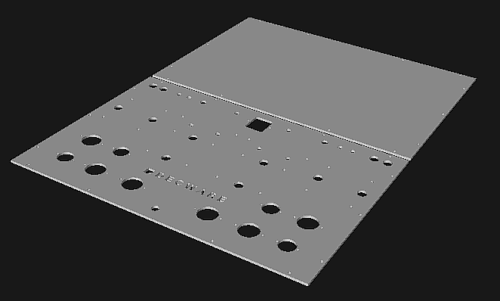
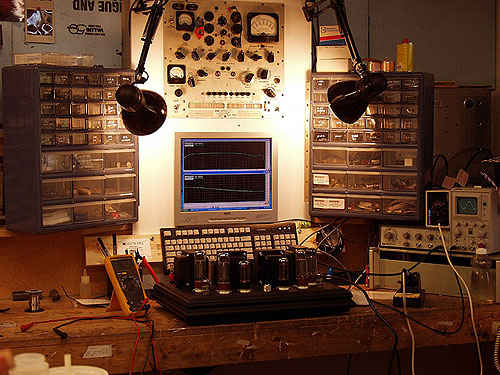
Part VII - Construction details The new TORII is built as two separate mono amplifiers each with their own power supply like the original Torii was. Rather than build it in another five sided steel chassis with a bottom plate I choose to make the new TORII from 1/8" thick aluminum plates. It makes it considerably stronger and the higher mass and stiffness helps to reduce resonance's. This way we can make wood bases that will enhance and offer variety to the appearance.
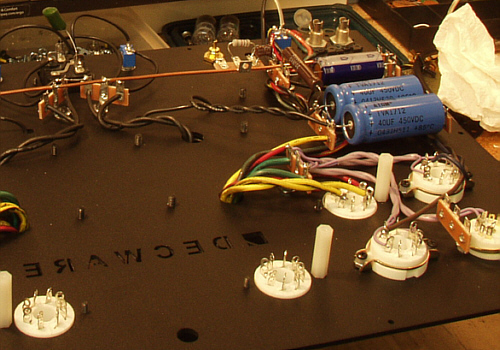
This layout was carefully designed so that the entire audio circuit could be done point-to-point using mainly parts leads. This eliminates most of the hookup wire and extra solder nodes and is not unlike our original Zen Triode amps. The jacks and switches are aligned along the back of plate and I have to say now that I've built a few, that's a feature I really like. This layout was first tested in a hand drilled steel chassis and found to work very well. As you can see it is a dual mono mirror image symmetrical layout. This will keep the wire lengths throughout the circuit exactly the same lengths and orientation from one channel to the other..
If we start at the beginning, the IEC connector that receives the removable power cord is the most expensive one I've found. You can find IEC connectors all over the place that look just as good for less than a buck, but I've always stuck with the best to ensure the best connection possible and long term reliability. Doesn't make much sense to plug an expensive power cord into a 89 cent IEC connector. This particular one has a hidden fuse holder integrated into it complete with a spare fuse inside. On the back of the IEC is a .02 uf poly cap to filter off noise and RF coming in on the power cord. This is the only item besides the aluminum plate that is common to both amplifiers (or channels). Each channel has it's own power switch. Again, these are the expensive Mountain switches that run $4.70 each. You can find exact looking clones of them everywhere for 75 cents. Don't make much sense to have a good power cord, wireless fuse holder and high end IEC connector if your going to blow it with a cheap switch.
The IEC connectors feed our proprietary US made 150 milliamp 600 volt power transformers which were made with heavy gauge lead wires and oriented so that the primary voltage (black wires) are not intermingled with the secondary wires (yellow, green and red). This transformer is significantly oversized to drive the 100 milliamp high voltage load and has no mechanical vibration or hum. As you can see the transformer leads go directly to their destinations via the shortest path possible. This keeps the AC fields to an absolute minimum. The heater wires (purple) are run individually in twisted pairs of stranded wire to each tube. They are also have a clear heat shrink tubing applied to them to keep the twists as tight as possible which prevents them from loosening over time.
I choose tube rectification for this amplifier for a few reasons. The reliability is superior over solid state diodes because diodes can fail from voltage spikes. Of course tube rectifiers can too but in general they are a lot tougher and most importantly IF one does fail, you can simply plug a new one in. When solid state diodes fail you have to send your amp back to the manufacture for repair. Another reason is sound quality. It's simply easier to maintain a clean and grain free midrange and treble with tube rectification. It is also possible to change the character of the sound by rolling rectifier tubes. This amp uses either 5Y3GT's, 5AR4's or 5U4's giving the listener a wide variety of signatures to work with. Between the two extremes, a 5Y3GT and a 5U4, you will see around a 30 volt difference in the DC high voltage feeding the plates of the output tubes. This increase or decrease in voltage will shift the tubes slightly towards different operating points of their plate and grid curves, hence changing the sound. (A pair of solid state diodes and the snubber caps and resistors required to replace a tube rectifier would cost around five bucks. The tube rectifiers/sockets in this amp increase the cost by around $60.00. I felt it was money well spent.)
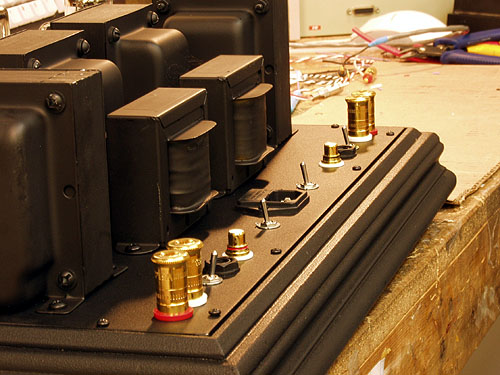
An improvement over the original Torii is the choke regulated supplies. It's the simplest and most effective way to get the job done.
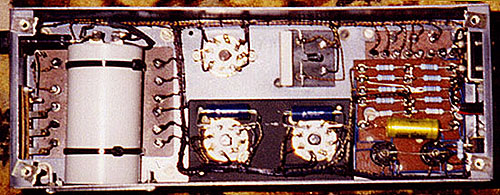
Using 15 Henry chokes rather than the more commonly used 5 or 8 henries just takes things a bit further. You can see the chokes located just behind the power transformers. In the previous picture they are the black twisted wires leading to the blue filter capacitors. The alternative to using a choke while still keeping things simple and straight forward (but less regulated) is to use a high wattage resistor like I did in the original Torii, but the results cause you to make a choice between quiet operation with more heat OR better dynamics with less heat and more hum. (The chokes add between $75 and $90.00 to the cost of this amp but the advantages well justify the cost).
The chokes work in harmony with the filter capacitors to remove AC ripple (hum) in the DC voltage. If you look at the photo prior to the one above, you can see the filter caps (light and dark blue) are SPRAGUE ATOM and NICHICON known to be the best available. I can confirm this with 10 years of experience using them. They simply don't fail unless something is severely wrong. Most importantly they carry current well. Most of the electrolytic caps available today while carrying the same voltage specs are downsized and drop the ball in a hurry when you ask them to do any real work. Using boutique "audiophile" caps such as Blackgates and similar over priced brands I find that they do not offer a proportional increase in performance in our products, but they do seem to have to be re-burned in every time you let the amp sit for any significant length of time without use, something I could do without. Again it doesn't make much sense to use high quality caps and a choke regulated supply if your going to shove it through a cheap 5 watt ceramic resistor in the last stage of your filter section to feed the critical small signal tubes. Again, in the same photo you can see I'm using a VISHAY DALE 10 watt wire wound in this position. (Ceramic / 50 cents, DALE / $4.00). These are ideal resistors to use because they simply never fail, especially when oversized as they are here.
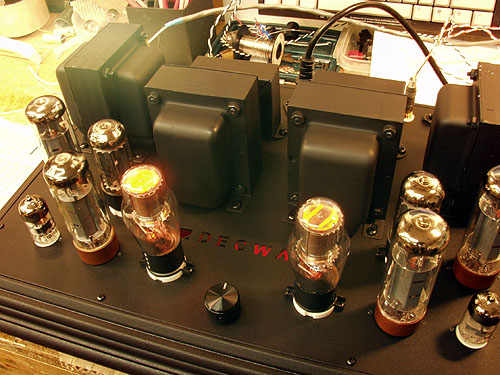
Something you just don't see very often unless it's a very expensive amp. Part of the reason for that is the complexity of so many tube regulation circuits. It's real easy for the tube regulation to be more complex and costly than the entire amplifier it serves. Does it have to be complicated to work right? Apparently not. Altec had a simple way of doing it back in the late 50's and I saw no need to re-invent the wheel so made the same choices.
Using a single OA3 vacuum diode were able to regulate the grids of the output tubes and everything down stream of it. This was an essential part of this circuit design to achieve linearity without feedback as talked about earlier. The alternative is to just leave the regulation out entirely. I spent an evening with the prototype amplifier doing some serious listening before adding the tube regulation and then again after adding it to see if it was worth the cost. I decided it was worth 4 times the cost. You can see the OA3 regulators in the picture above with the bright glow at the top of each tube.
Once you finally "get it" that the ground potential and power supply are part of the signal path, you realize that using the steel or aluminum chassis for the ground would be as counter-productive as sticking a Radioshack $1.99 cable on the end of a high dollar pair of audiophile interconnects. Even the first Zen Triode amps used a silver litz wire as the ground buss - not the chassis. In this amp I choose to use a 10 gauge solid copper buss because the silver litz wouldn't handle higher currents as well and frankly the solid copper may even be better. Keeping the buss symmetrical keeps the signal path identical for both channels.
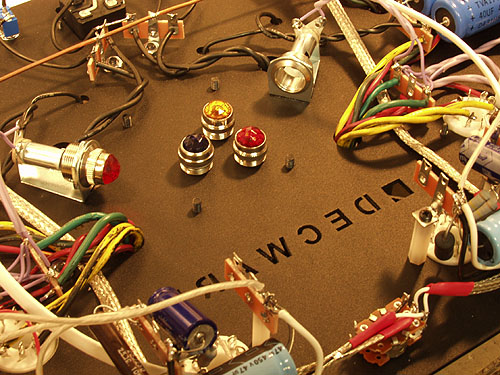
As you can see the DECWARE logo is lazar cut completely through the chassis so that we could place the indicator lights inside the chassis. That way you can see instantly when you flip either half of the amp on that you have power. You don't have to wait for the tubes to slowly start glowing to find out. (A really long wait btw, when the amps not plugged in)
Rather than use LED's for indicator lights (they can inject noise in some circuits) I choose to use very high quality indicator lamps driven of the AC heater supply. These lamps have been known to last 20 years without service. Should one go out for any reason you simply change the bulb. These lamps flood the inside of the chassis to create an even glow through the Decware logo by reflecting off the bottom plate. You can change the color of the light by changing the jewels shown in the picture above. I will be shipping them with red jewels but you could change them to yellow, orange, blue, purple or even green or white. Again, this costs 15 times more than an LED but it will never irritate you in a dark room, or add grain to your sound.
The input stage is down wind of the tube voltage regulation and further regulated by polypropylene caps. About six times the cost of electrolytic's but essential for keeping the sound glass smooth and liquid. The input stage is the 6922/6DJ8/6N1P a single triode with two halves. The first half is used as a simple single ended gain stage that is direct-coupled to the second half which acts as a phase splitter to drive the output tubes. This approach eliminates the coupling cap that would normally be seen here and keeps the phase shift down to an absolute minimum. I have found no other combination to be as coherent, dynamic or transparent when driving a pair of output tubes. This gives enough gain to reach full power on a 2 volt source making preamps optional.
The stage is fed off an ALPS 100K pot which is located on the physical path between the input jacks and the input stage. That makes it possible to keep the interconnect between the jacks and the stage as short as possible. I this amp I made special interconnects from silver plated stranded copper wire with Teflon insulation by threading both the positive and ground from the jack through a braided nickel steel shield that is grounded directly the copper buss. This is a cost-no-object approach to the input cable but it's a difference you can really hear, with a noticeable increase in smoothness and detail. This combined with the high quality Gold/Teflon RCA jacks ensures that even interconnects costing several thousand dollars can be used without fear of the signal being compromised.
Many would look into the bottom of a point to point wired amp and think it looks like a bowl of pasta - especially when compared to the neat appearance of circuit boards. The irony is that while visually it may look inferior, electrically it's a work of art with dozens of advantages not the least of which is better sound and reliability. Of the point to point wired amps you might look under the lid of a vintage QUAD amp and be impressed with how neat and square to the world the wiring is, but upon further examination you realize there is a hell of a lot of wire. Basically you have wires going to every pin of each socket that connect to the individual parts which then connect to more wires.
This approach looks neat but the bundled groups of wire are all talking to each other through small magnetic fields and degrading the signal with twice as many solder joints. The way we do it is to connect each part to the other via the parts leads directly wherever possible to eliminate the wire and extra solder joints. You end up with a very 3 dimensional layout that upon close examination is extremely logical and well thought out. 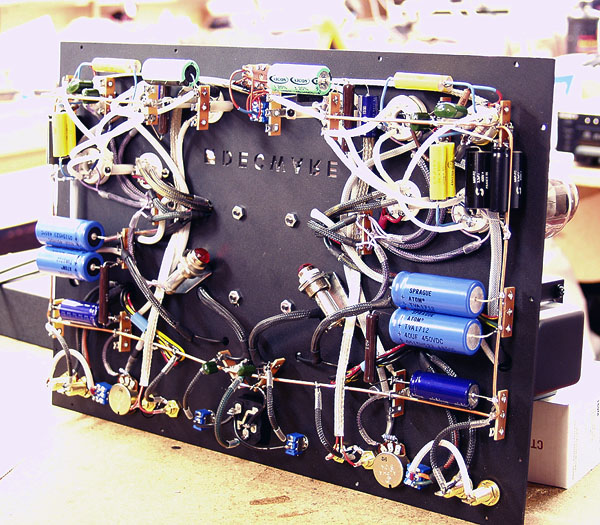
The audiophiles favorite part to modify... on the new TORII we recommend you please don't. The caps used have been selected for their benchmark coherency and the popular boutique audiophile caps have all been tried. These particular polypropylene film caps are made by General Electric. (A company with 100 million times the assets and resources of most boutique cap manufactures.) I have configured each coupling cap by using two in parallel each oriented in the opposite way. Even through poly caps are usually bi-polar, they are still wound from the inside out so there is bound to be a small change in the phase shift of the signal passing through it one way vs. the other way. By using a pair of identical matched values that are flipped with respect to each other we can be sure whatever happens on the positive cycle will be exactly duplicated on the negative cycle. In listening tests I can assure you this configuration had extraordinary clarity well above my expectations. It does however mean you have to buy 8 caps instead of 4.
The choice of output tubes in the new TORII greatly enhances the joy of tube rolling. You can use EL34's or 6550's or KT88's each with excellent results. All three sound a touch different. (It is important in this amp that you run matched pairs of output tubes because a non-matched pair can cut the overall power in half.) Besides the difference in sound between the three types of output tube you will also find differences in sound between the same types of output tube in different brands. All three of these tubes draw between 43 and 47 milliamps at idle, the perfect combination of class A operation and long tube life.
The output transformers in this amp are not ultralinear making possible tube regulation on the grids of the output tubes. These transformers carry a 35 watt rating and have excellent bandwidth in this circuit. They also feature individual taps on the secondary for 3.5 ohms, 8 ohms, 16 ohms, 250 ohms and 500 ohms. No series/parallel combining of various taps to get the value you need. I have configured the amp with 3.5 ohm and 8 ohm taps into a single pair of binding posts (per channel) using a high quality switch to select the impedance. This way you can change the impedance on the fly while you listen and decide for yourself what tap sounds best on a given pair of speakers.
The 250 ohm and 500 ohm taps from the output transformer can be used to drive a headphone jack. This way you can listen to most any headphone be it high or low impedance by simply plugging them into the appropriate jack. With many headphones it should be possible to also leave your speakers connected to the amp if you choose to do so. With the average efficiency of headphones being largely higher than loudspeakers you will find the headphones get loud quick when compared to the loudspeakers which will be playing at very low volumes. With the deafening levels of power available at the headphone jacks and the overall gain of the amplifier you'll want to be careful not to turn the volume up quickly. Since most people wouldn't use a 25 watt power amp to drive headphones this option does not come standard on this amplifier but is available as a custom request.
The WBT binding posts used on the new TORII offer a high compression connection to spade connectors and crimped wire ends up to 8 AWG as well as banana jacks in such a way that even the most heavy overbuilt speakers wires will not wear them out. Being top mounted means you can easily get to them without crawling behind the amp making it far easier to check your connections no matter if your amp is on a rack or sitting on the floor.
Part VIII - Listening tests Naturally the goal was not to make an inexpensive but unusually good sounding push pull amp at a magic price point for the people who don't "get" single ended flea power but rather to offer a product that sounds as good or better than our Single Ended amps which have a world wide reputation for sounding better than most other amps period. I can tell you that's a tall order and attempting it at a sane price put me under some extreme pressure. I am not one who particularly works better under pressure, at least it never feels like I'm doing better work. What the pressure does do is keep you from saying your done once you get the amp to sound good. In my case it's pure fear of failing that pushes me to explore everything that is possible. The final stages of the design, just like the ones before it, are tedious because the listening tests switch from the bench to listening room, with proper warm up and careful evaluation with every small change. It's simply relentless hard work. Even though as I write this in preparation for selling it, I don't know what other people will think of it's sound I do know how it compares to our other amplifiers and am very familiar with how people rate the sound of those. When I compare the Zen Triodes against it I find they have no significant advantage over the new TORII in the sound stage. In imaging I was shocked to find the TORII to be far more specific and honest, perhaps because of it's effortless headroom. The overall character of the SE84CS was more polite and slightly more laid back. Both amps are equally neural. The speed of the SE84CS has become world famous, but sounds slower than the TORII. Either amp have even a hint of grain or edginess, nor are they forward sounding as each has incredible depth. However the new TORII simply has more control and somehow considerably higher resolution. The comparison with the TABOO was similar when it was in standard mode and that also surprised me a little bit. The new TORII made the Taboo and the Select sound very close I guess because it sounds so different. Then I prepared to see things get interesting as I flipped the TABOO into lucid mode. The sound popped out and bloomed reaching the same boundaries and general sense of presence I was hearing in the TORII. God Bless the little guy, it almost did it but on careful listening the TORII just did it slightly better and with considerably more focus. Take a really good HD READY LCD or PLAZMA television display and watch a really good DVD movie on it. The clarity of the picture and color depth is wonderful. Then on the same display watch a show that was shot with High Definition Cameras. This is the closest thing I can come up with to compare the sound of the new TORII to even our single ended amplifiers. By the third night of listening I concluded that many of my recordings were far better than I thought they were and that through this amplifier's ease and transparency I felt like I was listening to the recordings as if they were naked. It was like hearing naked music without anything attached to it without restrictions. Images have clearly defined edges just as they do on High Definition TV.
PART IX - Conclusion I think this amp will impress audiophiles using most loudspeakers assuming they realize 500 watt amplifiers always get louder and sound worse than 50 watt amplifiers and 50 watt amplifiers always get louder and sound worse than 5 watt amplifiers. And that they strive to find the lowest acceptable point on that power line that they think will still keep them happy. We already know that magic number is 25 watts. I also think this amp will catch our own customers off guard as they are far harder to impress. This is because it is fully at home with high resolution/high efficiency speakers. My favorite speakers on it are 94dB 1w/1m because they have the speed and resolution to show off what the amp can do and because I can turn the amp up to deafening levels without loosing "usable power". Frankly having something that sounded as good as a Zen Triode amp that I could play as loud as I want has been something I've wished for ever since building the first Zen in 1996. I now feel like I've reached that goal. I anticipate there will be those who think this new TORII simply smokes our Single Ended Amps just as there will be those who think the Single ended are better. It boils down to the slightly romantic interpretation known to Single ended amps vs. the more realistic (live) and honest presentation of this new amp.
This will be our 10th year since this January since going on line in 1996. So it becomes approprete that this will be our 10th aniversary amplifier as well as a turning point for our company as we expand our niche of lower power amps to include everyone. Decware has no plans to build a more powerful amplifier than this. Unless you have very low efficiency (power hungry) speakers this will be more than enough power. If you do have very low efficiency speakers (84 dB or less) then the resolution and finess of this amplifier may be wasted. Between 89dB and 94dB is an ideal efficiency for this amplifier. Steve Deckert
|
|
Decware is a trademark of High Fidelity Engineering
Co. |
 The
problem with the original TORII reinforces the fact that just because
you design and build a perfect working amplifier doesn't mean you
can build 100 more just like it and expect prefect results from each
one until you first know how. Ironically that knowledge
doesn't come until you get to number 25 or so.
The
problem with the original TORII reinforces the fact that just because
you design and build a perfect working amplifier doesn't mean you
can build 100 more just like it and expect prefect results from each
one until you first know how. Ironically that knowledge
doesn't come until you get to number 25 or so.